Data Management with Filters
While working on tasks, leads, or complaints, we often gather a huge amount of data. Without structure, this information can quickly become overwhelming. That’s where Pronnel’s filtering system steps in—helping you make sense of your data with ease. Pronnel offers two types of filters: Quick and Advanced. In this video, we’ll focus on Quick Filters and the Advanced Filters, the foundation for all data sorting and searching within Pronnel.
Basic Filters Overview

Pronnel's filters are your first defence in taming your data. To access them, click on the Filter icon. Once you do, you'll be presented with a filter popup.
How to add filter
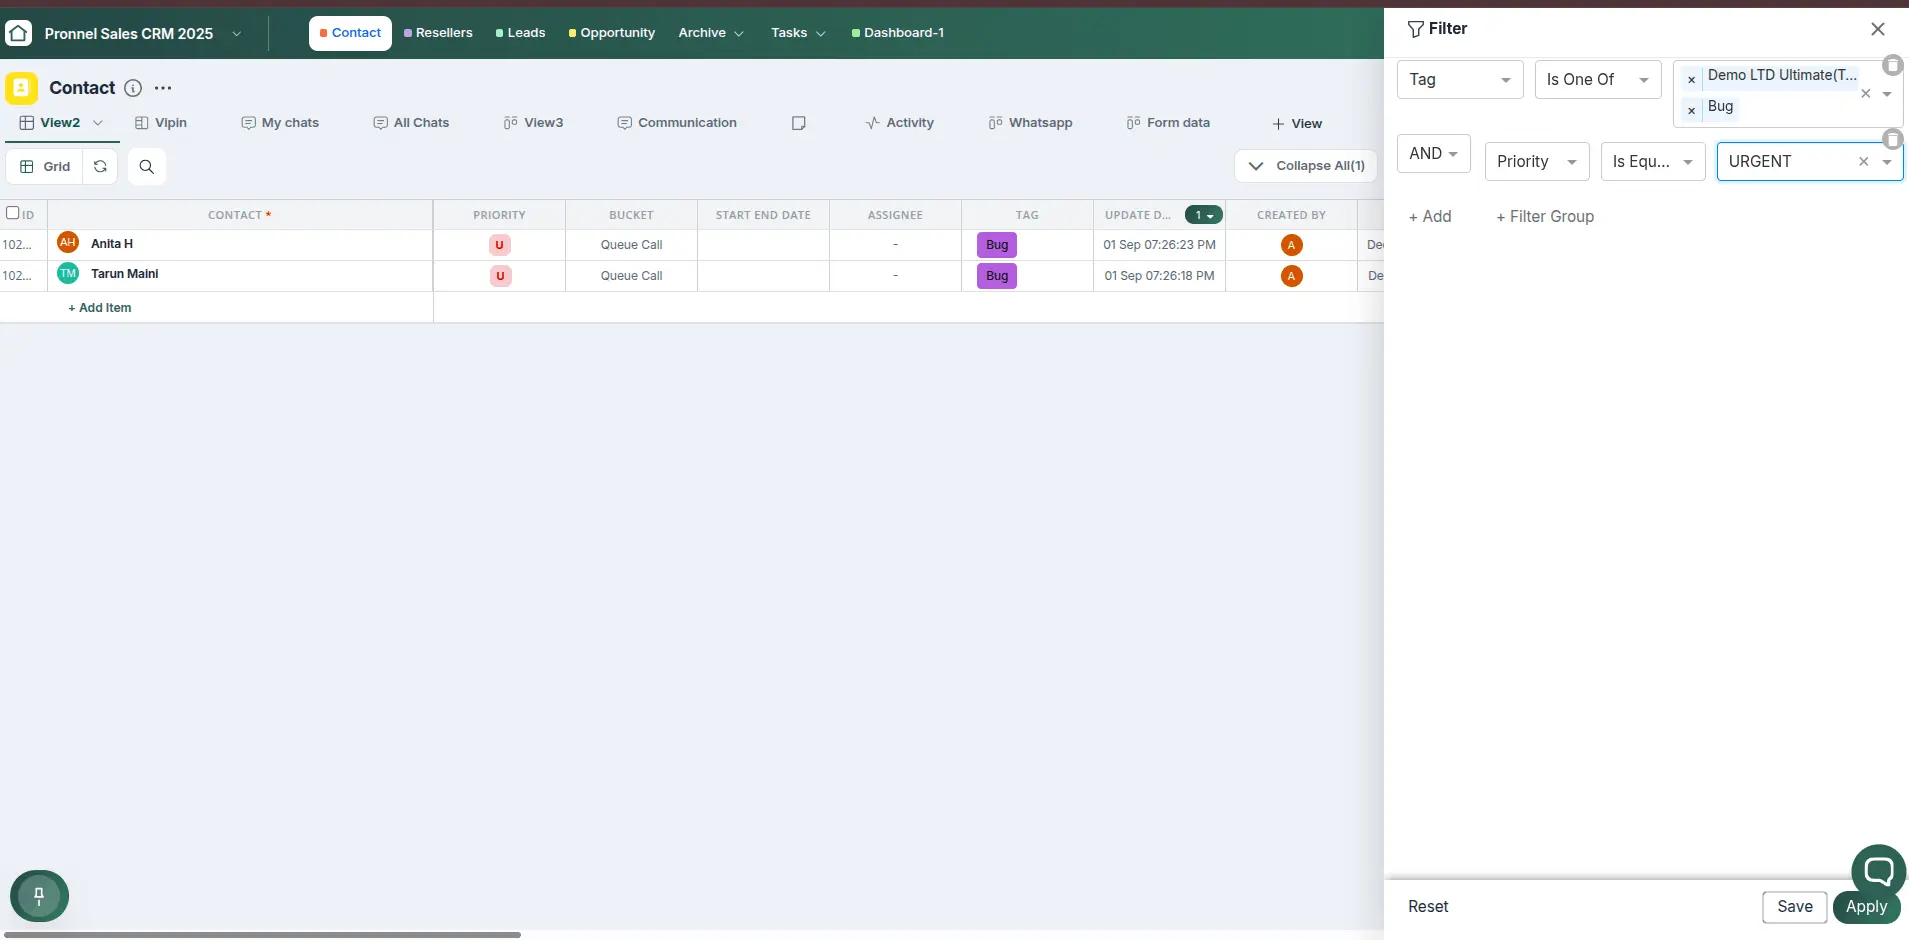
This filter mainly work on 'AND' and 'OR' logic. You can add multiple filters to filter your data based on your needs.
There are two option Filter group and without filter group.
Let's take an example that you want to filter the data based on Tags and Priority. First choose the tag from first dropdown. Now from second dropdown of operator choose one of the option you can see 'Is Equal to' and 'Is Not Equal to','Is One Of','Is Not One Of','Is Empty','Is Not Empty'. Let's take 'Is Equal to' option. Now you can see the dropdown of tags. Choose the tag you want to filter.
Now we have done with first part of filter. Now we have to choose the second part of filter. Click on '+ Add' button and choose 'AND' or 'OR' option. Let's take 'AND' option. Now you can see the dropdown choose priority then from second drop down lets choose the operator. Let's take 'Is Equal to' option and then choose the priority you want to filter. Now click on 'Apply' button. You will see the data based on your filter.
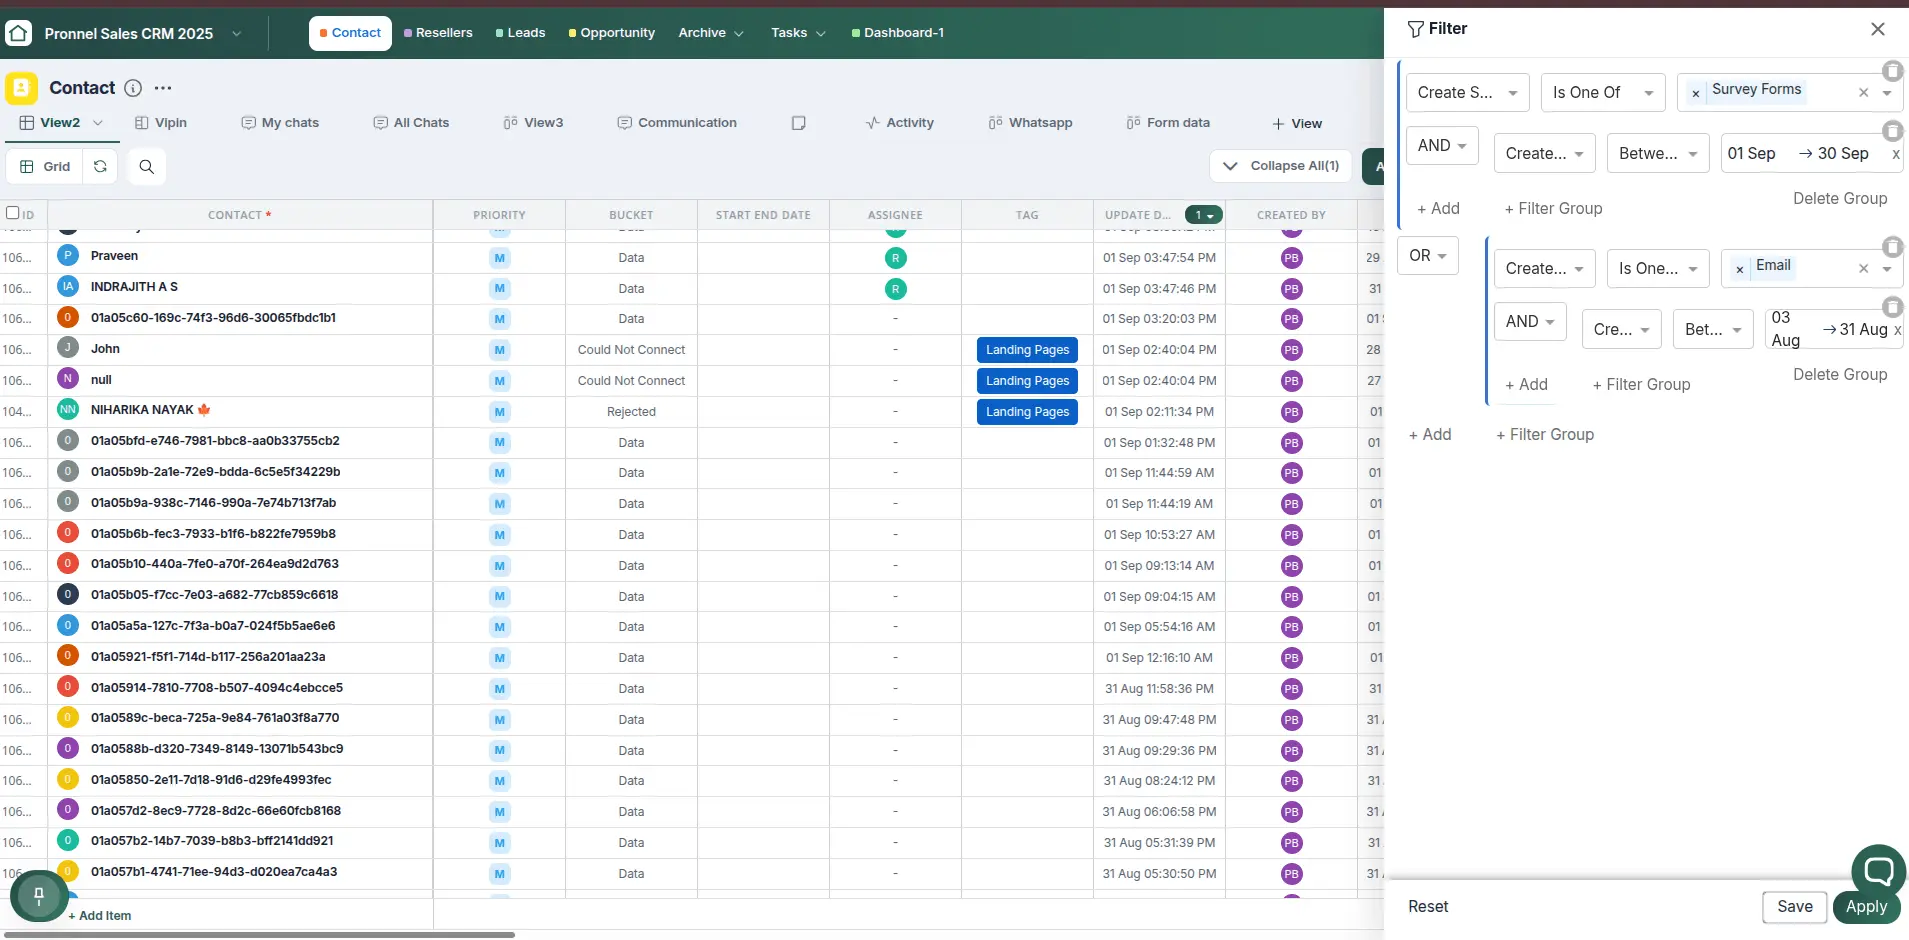
Let's understand how filter group works. Lets take an example you want to filter out data such a way that created source is 'Form-1' and created time is between '01-04-2026' and '30-06-2026' 'OR' created source is 'Form-2' and created time is between '01-07-2026' and '30-09-2026'.
Now here the concept of filter group comes into play. As soon as you open filter just below first row you can see 'Filter group' click on it. Top for the dropdown you can see delete icon click on it we don't want it as we are creating filter group. Now from drop down search for 'Created Source Form' and choose it. Now from second drop down lets choose the operator. Let's take 'Is Equal to' option and then choose the created source you want to filter in our case it is 'Form-1'. Now below drop down choose 'AND' or 'OR' option. Let's take 'AND' option. Now you can see the dropdown choose 'Created Time' then from second drop down lets choose the operator. Let's take 'Is Between' option and then choose the priority you want to filter. Now first group filter is created.
Now we have to create second group filter. Click on '+ Add' button and choose 'OR' option. Now you can see the dropdown choose 'Created Source Form' and choose it. Now from second drop down lets choose the operator. Let's take 'Is Equal to' option and then choose the created source you want to filter in our case it is 'Form-2'. Now below drop down choose 'AND' or 'OR' option. Let's take 'AND' option. Now you can see the dropdown choose 'Created Time' then from second drop down lets choose the operator. Let's take 'Is Between' option and then choose the priority you want to filter. Now second group filter is created. Now click on 'Apply' button. You will see the data based on your filter.
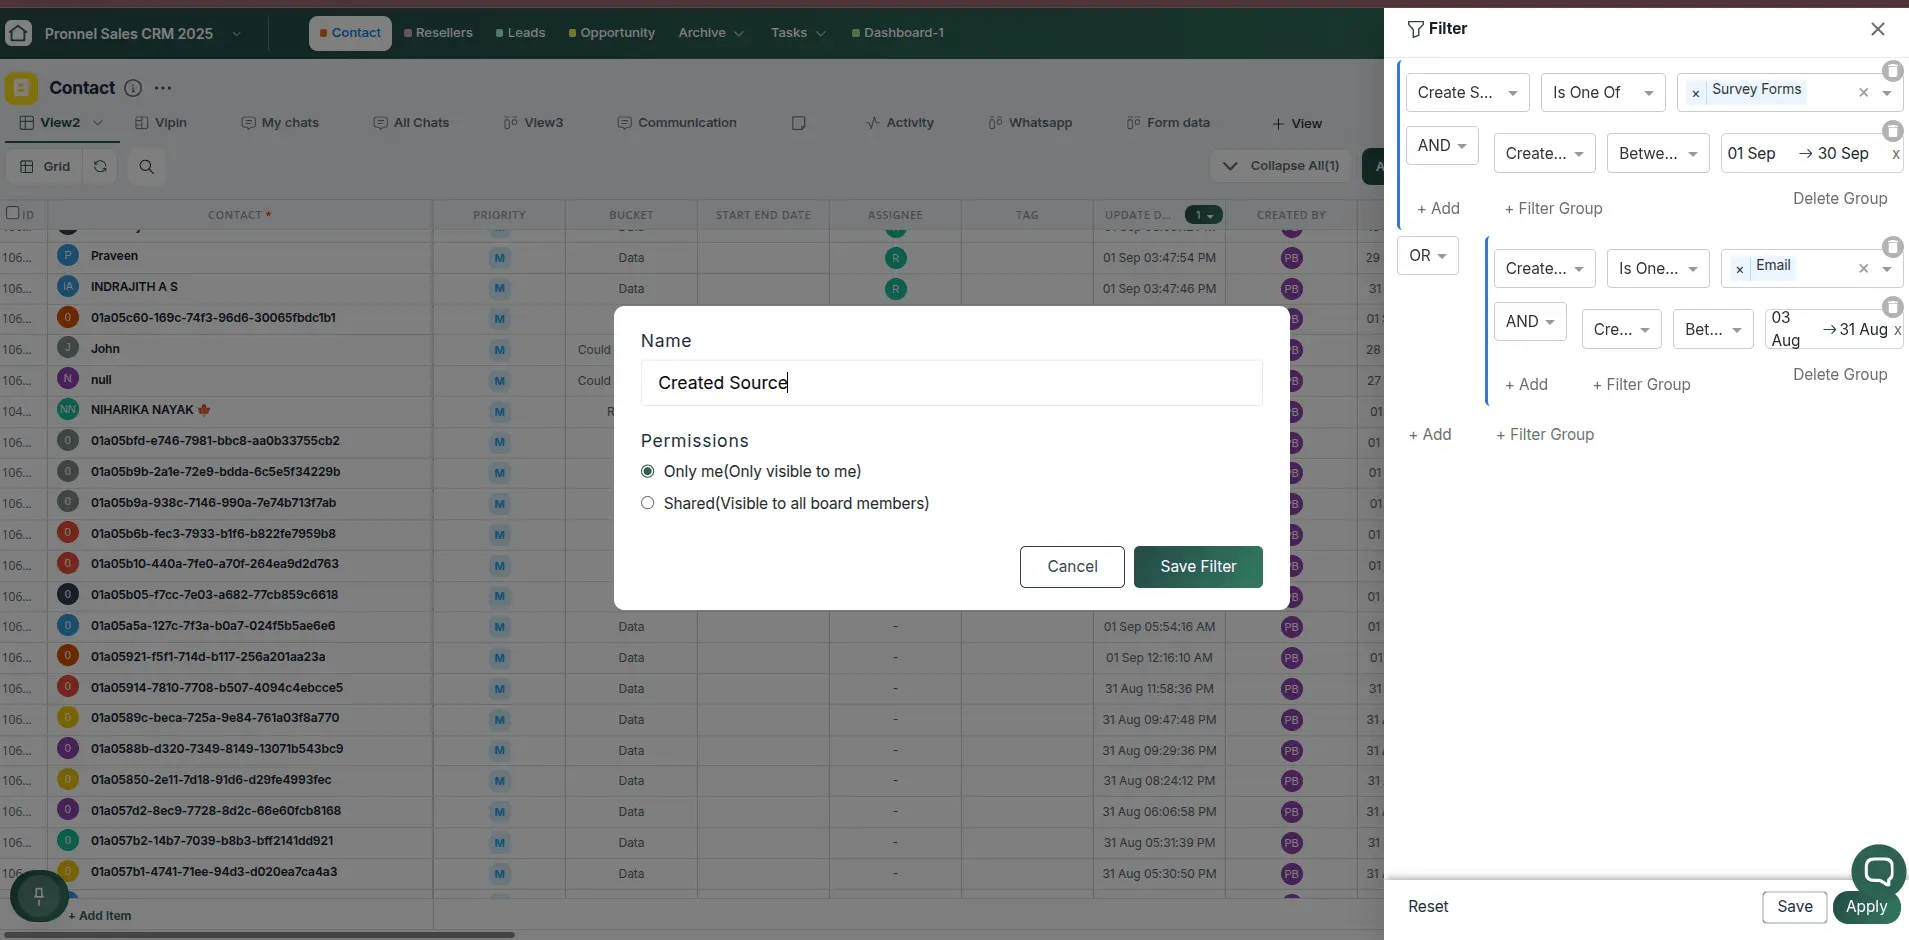
You can Delete filter group by click on Delete Filter group by click on 'Delete Group' text and for without filter group click on delete icon appears on each row top right corner.
In below of the modal you can see 3 options 'Apply','Reset' and 'Save Filter'.
'Apply' button is used to apply the filter.
'Reset' button is used to reset the filter.
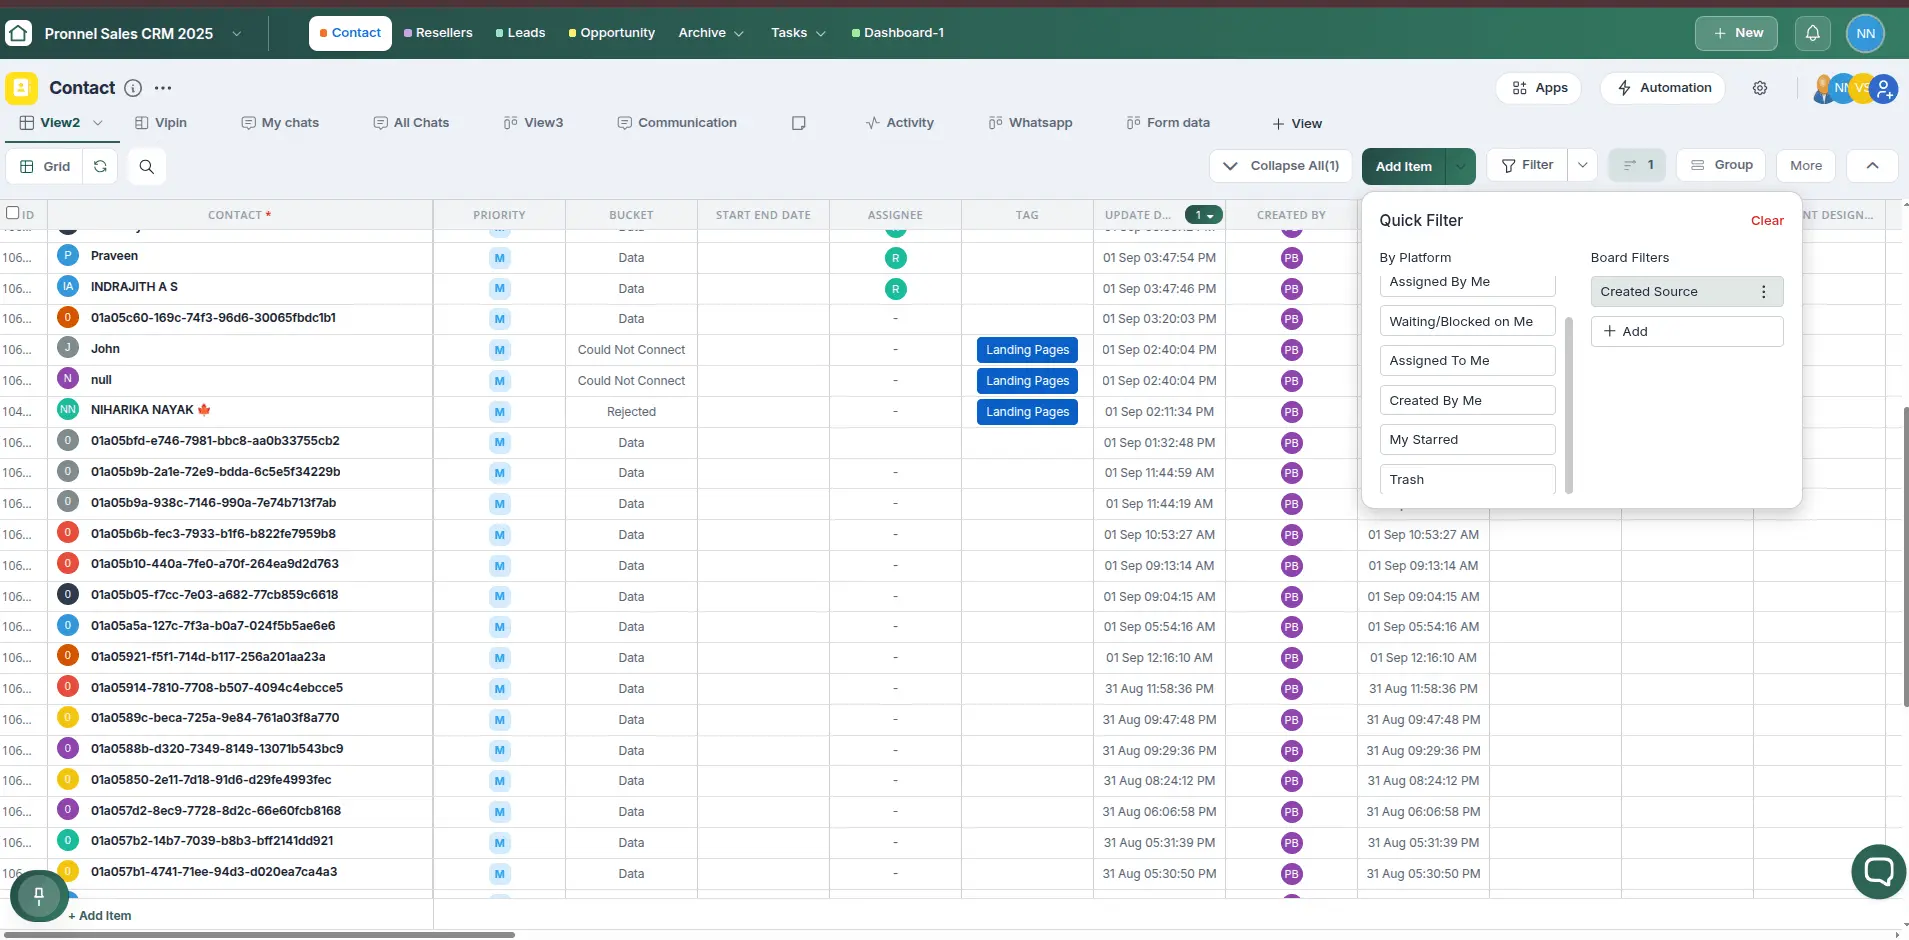
'Save Filter' button is used to save the filter currently created for further access. Now on click of 'Save filter' It won't get applied it will just save the filter for future use. Now on click of 'Apply' button it will apply the filter. You can apply saved filter by click on 'Qucik Filter' button.
Conclusion
Congratulations! You’ve now gained a solid understanding of how to use Filters in Pronnel to organize, sort, and manage your data with confidence. Whether you’re tracking tasks, leads, or issues, these filters help you stay focused and efficient by showing you only what matters most. From standard options like assignees and dates to custom attributes and special filters like mentions or delayed items, Filters offer a strong foundation for your data management needs. You’ve also learned how filters are saved within views, so your setup remains consistent each time you return. This is just the beginning! Be sure to check out the next tutorials on Quick Filters to unlock even more ways to control and customize how you work in Pronnel. Let filters do the heavy lifting—so you can focus on what’s important.
Frequently Asked Questions About Basic Filters in Pronnel
What is Pronnel, and what does it do?
Pronnel helps organize, track, and manage tasks, leads, and complaints with powerful filtering and sorting.
How do I access filters?
Click the Filter icon to choose field from drop down and operator from second drop down and then choose the value to filter.
Can I filter by custom attributes?
Yes. If a connected board is added as a custom attribute and mirrored, you can filter by those attributes.
What special filters are available?
Created source, Created time, Created by, Modified time, Modified by, Deleted time, Deleted by, Public items, Starred, Mentions, Delayed, Deleted, and items with external collaborators etc.
Can I save filter settings?
Yes, and it’s covered further in the Quick Filters tutorial.
Do filters persist when I revisit a view?
Yes. Filters are view-specific and remain active when you return to the same view.
Why my filter is vanishing after refresh?
In Preference you might have choosen auto save false. So it is not saving the filter. On view hover you will 3 horizontal dots on click of it it will open popup. Hover on Preference and choose which option you want. If you choose Always show then everytime you change filter on bottom side you will get pop up click on Yes to save the filter.
Why after saving filter not showing in Quick Filter for my Board users?
This is typical mistake done by admin. Admin saves the filter in his account as only me. But he forgets to share the filter with his board users. So board users are not able to see the filter in Quick Filter. To share the filter with board users, admin needs to go to the filter and click on share icon. Then select the board users and click on share.
On saving filter what does it mean by Only me, Shared?
Only me means the filter will be saved in your account only and will not be shared with any other board users. Shared means the filter will be shared with all the board users.