A Step-by-Step Guide to Setting Up Chatbot in Channel
Use this tutorial to set up your chatbot in Pronnel and connect it to multiple channels. You’ll learn how to create a chatbot, build a Knowledge Base, attach it to the bot, and then plug that bot into Live Chat, Chatwoot, and popular social messaging apps.
Once configured, the same chatbot can answer on your website, WhatsApp, Instagram, Telegram, Viber, Line, Messenger, and Chatwoot inboxes, while automations help you reach out or follow up automatically.
Complete Guide: Setting Up Chatbot in Channels
Step 1: How to Create a New Chatbot
From the top navigation, open your Customer Board where you manage leads or customers.

Click the Settings icon in the top-right corner of the board.

In the Settings panel, scroll down and click on the Chatbots section.

Choose the type of chatbot you want to create.

- Click on the + Add icon to create a new chatbot
- Click on the + icon to create a new chatbot prompt.

Step 2: How to Create a Knowledge Base
In the same Settings panel, scroll down and locate the Knowledge Base section, then click on it.
Click the Add button to create a new Knowledge Base or add new content to an existing one. You can add information in multiple ways:
- From Website URL – Import all readable content from a single website URL to create knowledge pages.
- From Separate Pages URL – Add multiple specific URLs. Each URL becomes its own knowledge page.
- Host Web Pages – Design and host custom pages inside Pronnel that the chatbot can use as reference.
- Upload Files – Upload PDFs, DOCX or text files. Each file is converted into knowledge pages the chatbot can read from.
Organize your content by topics (for example: Pricing, Features, Onboarding, FAQs) so that the assistant can provide precise answers.

Step 3: How to Configure Your Chatbot Assistant
The prompt creation panel allows you to fully customize your AI Calling assistant. Each section helps define how your assistant behaves, speaks, and performs actions during and after the call. Refer to the image below while reviewing the instructions:
- Assistant Name – Give your chatbot a unique name. This helps identify the assistant inside your AI Calling projects.
- First Message – Write a custom message that the assistant will speak when the call begins. This becomes the intro line for every conversation.
- Instructions – Provide specific guidance on how the chatbot should behave, what information it must collect, and how it should interact with the customer.
- Functions – (Optional) Select from predefined functions if your chatbot needs to perform additional automated tasks such as fetching data or updating records.
- Use Case – Click on the dropdown and select the use case for the chatbot.It has two option Calling and messaging.Choose the messaging option if you want to use the chatbot in messaging channels.
- Your Voicemail Reply – Customize the voicemail message that your assistant will leave if the customer does not answer the call.
- After Call Actions – Define what should happen once the call ends—for example, update a status field, send a follow-up message, or trigger an automation.
- Voice Settings
- Language & Voice – Choose the assistant’s speaking language and select from available standard or premium voice options, or upload a custom voice.
- Background Sound – Add optional background ambience (e.g., call center noise) to make conversations sound more natural.
- Energy & Style – Adjust the tone, energy level, and speaking mood to match your assistant’s personality.
- Personality & Behavior – Describe how the assistant should talk, react, and handle different situations during the call. You can define tone (friendly, formal, energetic), pace, and any behavioral guidelines.

Step 4: How to Connect a Knowledge Base to Your Chatbot
After creating your Knowledge Base, go back to the Chatbots section under board Settings and open the chatbot you created earlier.
- Locate the Knowledge Base dropdown.
- Select the Knowledge Base that contains the content you want the chatbot to use.
- Click on Manage if you want to edit, add, or remove pages from that Knowledge Base.
- Enable any available completion triggers if you want the chatbot to stop responding after achieving a specific goal (for example, once a booking is done).
From now on, when a user asks a question, the chatbot will first look into your Knowledge Base and then respond using that information combined with its instructions.
Step 5: How to Use the Chatbot in Live Chat & Chatwoot
The Live Chat channel lets you embed a chat widget on your website so visitors can talk to your chatbot in real time.
Create a instance of live chat in pronnel
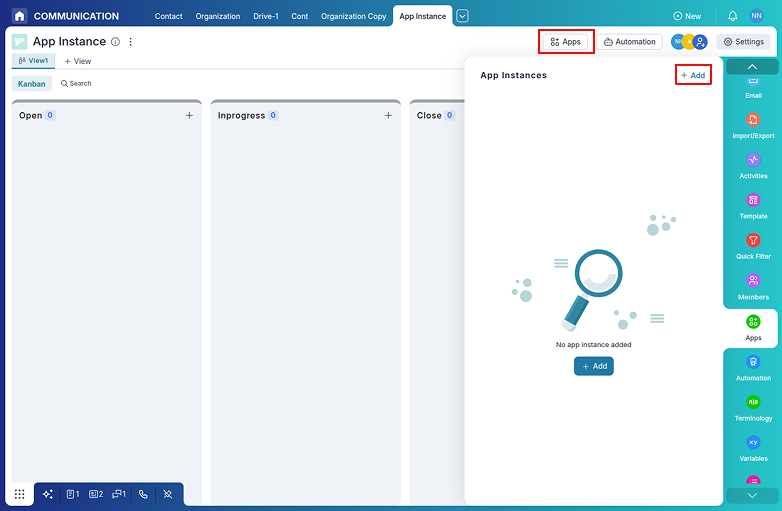
- In Settings, open the Apps section.
- In the app integration section, find and click on the Live Chat integration card. Choose the public instance (live chat/chatwoot will work with public instance):
- Private: Only visible and accessible to you.
- Public: Visible and usable by all team members with access to the board.
- Copy the HTML code from your Live Chat dashboard and paste it in the website where you want to embed the Live Chat widget.


To create a instance of chatwoot in pronnel refer to the Chatwoot Integration Tutorial.
Connect the chatbot to the live chat instance
- In Settings, open the Channels section.
- Click Add Channel and select Live Chat option from 'Apps' section.
- Give the channel a clear Name (for example, “Website Support Chatbot”).
- Choose the Chatbot you created earlier from the dropdown.
- Save the changes and click on the Update button.
- Toggle Enable and click Update to activate the Live Chat channel.


Once embedded, visitors can open the chat widget and interact with your chatbot directly on your site.
Using the Chatbot in Chatwoot
If you use Chatwoot as your shared inbox, you can connect it so Pronnel’s chatbot handles incoming conversations first and then escalates to human agents when required.
- In Settings, open the Channels section.
- Click Add Channel and select chatwoot option from 'Apps' section.
- Give the channel a clear Name (for example, “Website Support Chatbot”).
- Choose the Chatbot you created earlier from the dropdown.
- Save the changes and click on the Update button.
- Toggle Enable and click Update to activate the Live Chat channel.
- Add Accound id and Inbox id from the dropdown.

Now, contacts reaching you via Live Chat or Chatwoot will first interact with your AI chatbot, while your team can still step in at any time.
Step 6: How to Use the Chatbot in Telegram (and same flow applies to other channels)
Telegram Channel
Integrate your Telegram bot so the chatbot can receive messages, reply to users, and post into channels. Follow the steps below to create a Telegram bot, get its token, and connect it to Pronnel.
-
Create a Telegram bot (BotFather) – On Telegram, open @BotFather, send
/newbotand follow the prompts to create a bot. You will receive a Bot Username (e.g.mycompany_bot) and the Bot Token (a long string). Copy the token — you will need it in Pronnel. - Go to Channels in Pronnel – In Settings, open Channels and click Add Channel.
- Select Telegram – Choose Telegram from the channel list.
-
Enter the Bot Username – Paste the bot username you created (without the
@). - Paste the Token Number – Paste the Bot Token you copied from BotFather into the Token field. This authorizes Pronnel to send and receive messages via your bot.
- Do Not Create Contact – Enable this checkbox if you do not want incoming messages to automatically create new contact records in Pronnel. Leave it unchecked if you want each new Telegram sender to be added as a contact.
- Add Chat Bot to Channel – Toggle this ON if you want to connect the chatbot to a Telegram channel/group.
-
Scan QR / Use Link – After you save, Pronnel shows a QR code and a link (e.g.,
https://t.me/your_bot) that users can click or scan to open the bot in Telegram. Use the QR or link to quickly test or share the bot. - Update – Click Update to save the Telegram channel settings and enable the integration.
- Test the Integration – Open the bot link or scan the QR code and send a test message. Confirm that messages appear in Pronnel and that the chosen Chatbot replies according to your prompts/knowledge base.
Apply the same pattern for other channels
The overall flow is identical for other messaging channels — create/get credentials from the provider (Facebook/Meta, WhatsApp API provider, Instagram), then:
- Settings → Channels → Add Channel
- Select the channel type (Instagram / WhatsApp / Facebook)
- Paste the required credentials (Meta OAuth, WhatsApp API token, Twilio/360dialog keys, etc.)
- Choose the Chatbot to handle messages
- Configure contact creation, templates/opt-ins (WhatsApp), and domain/permission settings (Instagram/Facebook)
- Save / Enable and test
Because each provider has small provider-specific steps (for example: connect Meta Business account for Instagram/Facebook, register a WhatsApp Business number with a provider, or obtain API keys from Twilio/360dialog), follow the provider’s onboarding to get the credentials — then return to Pronnel to paste them and enable the channel.

Step 8: How to Run Automations Using the Chatbot
Automations help you trigger chatbot actions automatically whenever a message is received on any connected channel such as Telegram, WhatsApp, Instagram, or Facebook. This allows your system to reply instantly, add comments, or start workflows without manual work.
Accessing Automations
- Open the board’s Settings panel.
- Choose Automations from the left sidebar.
- Click the + Add button to create a new automation.
Step 1: Choose a Trigger
For chatbot-related actions, select the trigger:
- Incoming Channel Messages – Runs whenever your connected chatbot receives a message from Telegram, WhatsApp, Instagram, or other enabled channels.
Then choose:
- Your Board (e.g., Contact Board)
- Your Channel (e.g., XXXXXX Telegram)
Step 2: Add an Action
After selecting the trigger, choose an action for what should happen when a message arrives:
- Add Comment – Automatically adds the incoming message as a comment inside the item, keeping the full conversation history in one place.
- Send Message (optional) – You can later extend the automation to send automatic replies if needed.
In the example shown above, the automation uses a very simple flow:
- Trigger: When Channel Message is Received
- Action: Comment Add (adds the message to the item)
Step 3: Save & Publish
- Click Save to store the automation.
- Click Publish to activate it.
Once published, every incoming Telegram/WhatsApp/Instagram/Facebook message will automatically appear under the related item as a comment—keeping conversations organized and easy to track.

Conclusion: Launch Omnichannel Chatbots with Pronnel
You have now learned how to create a chatbot, build a Knowledge Base, connect them together, and deploy the bot across multiple channels including Live Chat, Chatwoot, Instagram, WhatsApp, Telegram, Viber, Line and Messenger.
With this setup, you can offer 24x7 intelligent responses, capture leads, answer FAQs, and route complex queries to your team—without switching tools for each messaging app.
Next step: create or open your first chatbot in Pronnel, connect it to at least one live channel, and then add automations to scale your customer conversations.
Note: Channel options and settings may evolve over time. If you don’t see an option covered in this guide, check the latest in-product help or contact support.
Frequently Asked Questions About Pronnel Chatbot Channel Setup
What is a chatbot in Pronnel?
A chatbot in Pronnel is an AI assistant configured with prompts, instructions, and knowledge sources. It can answer questions, collect information, qualify leads, and trigger actions across channels like Live Chat, WhatsApp, Instagram, Telegram, Viber, Line, Messenger, and Chatwoot.
Do I need a Knowledge Base for my chatbot to work?
You can run a chatbot with just instructions, but connecting a Knowledge Base makes it much more powerful and accurate. The bot can then answer from your website content, hosted pages, and uploaded documents instead of relying only on a generic script.
Can I use the same chatbot across multiple channels?
Yes. The same chatbot can be attached to Live Chat, Chatwoot, Instagram, WhatsApp, Telegram, Viber, Line and Messenger. This keeps your tone, answers, and workflows consistent across all customer touchpoints.
What channels are supported for chatbots in Pronnel?
Pronnel supports multiple channels including Live Chat (website widget), Chatwoot, Instagram, WhatsApp (via WhatsApp Business API), Telegram, Viber, Line and Facebook Messenger.
Why is my chatbot not responding in a specific channel?
Common reasons include:
- The channel is not enabled or connected correctly.
- The chatbot is not selected in the channel settings.
- Required API keys or tokens (for WhatsApp, Instagram, Telegram, etc.) are missing or invalid.
- The automation or trigger conditions are not met.
- Permissions were not granted in the external platform (Meta, Telegram, Viber, Line).
- The ticket/item has assigned to a Human Agent.
Can I see what my chatbot said to each user?
Yes. Conversation logs can include full message history, timestamps, context, and any actions taken. This allows you to review interactions, improve prompts, and verify that the bot is answering as expected.